You are currently viewing 5 Ways to Improve Your Squat

5 Ways to Improve Your Squat

Squatting is a foundational movement so I wanted to provide this guide, 5 Ways to Improve Your Squat, to help people feel more comfortable and confident in their ability to squat. The goal is to prevent injuries and maximize performance. This is not meant to be a definitive guide on the “correct” way to squat. I hope the reader can find areas to improve on with simple at-home testing and then make the necessary adjustments using the resources provided.  I focused on 5 common areas of dysfunction that when fixed will very quickly improve your squat. 

If you live around Omaha, I will be presenting this information in the future with live in-person seminars alongside Jon Day, coach and owner of Artis Strength and Fitness. 

Jon Squat

1. Ankle Mobility to Improve Your Squat

Nothing can wreck a squat faster than poor ankle mobility. The solution is to either improve ankle mobility or cheat it.

The best place to start looking at ankle mobility is with a bodyweight squat, shoes off, no weight.  That is why I have chosen Ankle Mobility as the first section in the 5 Ways to Improve Your Squat guide. This provides a lot of data in a short amount of time. Starting with a squat allows us to see where the athlete or patient is currently at.

The ankle mobility necessary to squat depends on the depth the individual is trying to achieve and the movements they are trying to execute. Generally, walking requires around 10 degrees of ankle dorsiflexion. An interesting study in 2006, by Hemmerich, found that the further you go into a squat position, the more dorsiflexion required. Maximal squat depth to just past parallel requires almost 35 degrees of dorsiflexion.

Million Dollar Ruler

I call it the Million Dollar Ruler because it transforms an ordinary ruler into an extraordinary ruler by objectively measuring ankle dorsiflexion. Not only does it tell how much they can bend in this area, but I can also assess the quality of the movement. I use 4 inches as a starting point but also look for side to side differences. Some may argue that 4 inches is not enough but as previously stated, research demonstrates a squat just past parallel requires approximately 35 degrees. Ultimately, it depends on the patient’s goals.

Research demonstrates that every centimeter on the knee to wall test (Million Dollar Ruler) corresponds with 3.6 degrees of ankle dorsiflexion.

10.16 centimeters (4 inches) x 3.6 degrees = 36 degrees of ankle DF

This is an easy to implement test that I believe more gyms and weight-rooms should utilize. The knee to wall test is a reliable method of assessing ankle dorsiflexion range of motion.

Six Inch Step Down

The six inch step down test focuses more on control of the lower extremity in single leg stance but also challenges ankle dorsiflexion enough to flush out any issues. I like this test to show patients how ankle mobility influences kinematics upstream, particularly at the knee. Many people will end up cheating this with external rotation of the foot and ankle.

Cheat Ankle Dorsiflexion

Some individuals may find the need to cheat ankle dorsiflexion due to anatomical limitations or not wanting to spend the time to improve it.

  • Get outside the sagittal plane – many times individuals naturally select a foot placement outside of the sagittal plane. This movement into the frontal plane helps hide some foot and ankle mobility issues and effectively shortens the femur (more on this later)
  • Lifting shoes: the raised heel helps mask foot and ankle restrictions allowing for a more upright torso with lifting. There are various degrees of heel lifts in these shoes and many find them to be extremely helpful.

Try before you buy: Snag some 5 pound plates and place under your heels. This will help simulate what a weightlifting shoe would feel like. This can be visualized in the image below (far right).


ankle dorsiflexion during the squat

Improve Your Ankle Dorsiflexion

Measure your ankle dorsiflexion on both sides using the Million Dollar Ruler. Use this as your movement baseline and then implement these mobility exercises as part of your program. Eventually you can use your original measurements to compare to as your mobility improves. Tissue takes time to remodel so don’t expect gains right away. Give it 6 weeks of consistent input.

Exercises:

1. Half-Kneeling Mobilization (2:25)

1a. Medial and Lateral Glides

1b: Bounces

1c: Advanced: PAILS/RAILS (3:37)

2. Banded Mobilizations (6:09):

3. Deep Squat w/ KB counterbalance (7:16) 

Additional notes and text on each exercise can be found in the YouTube description.

2. Abdominal Bracing for a Better Squat

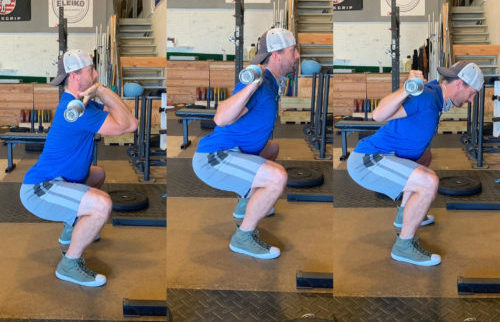
Goldilocks principle applies here. Not too much, not too little, but just right. Most can agree that lumbar spine rounding in the bottom of a squat can increase the risk of injury. However, many people tend to over-emphasize a lordotic posture which has the potential to aggravate their lower back and/or limit their hip flexion depth.

Spine, rib cage, and pelvis orientation are important when under load. I like to tell people to think about stacking your rib cage over your pelvis. This is a better position to activate the diaphragm. When the diaphragm contracts it flattens inside the abdominal cavity. This contraction decreases the volume and effectively pressurizes creating an abdominal brace.

Have you ever heard of Boyle’s Law? Boyle’s law states that pressure is inversely 
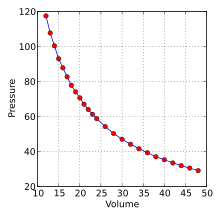
proportional to volume. What that means is that as the volume decreases, the pressure increases. This phenomenon allows for effective support to the lumbar spine by concentrically contracting the diaphragm, pressurizing the abdominal wall, which supports your lumbar spine when squatting.

Improve your abdominal brace

Breathing with your diaphragm and pressurizing your abdominal wall is slightly more difficult than it sounds because many people tend to “suck in”. I like the following sequence to start to teach this concept.

 Triple Flexion Position 

This is a great position to learn how to effectively breathe with your diaphragm and create pressure in the abdominal wall. The triple flexion position approximates the rib cage and pelvis helping to facilitate diaphragm activation.

Isometric Holds -> Dead Bug

Transitioning to being able to maintain proper abdominal brace while engaging and moving through the limbs is important. With these movements the lumbar spine is wanting to to go into extension so being able to maintain a neutral spine with the back on the table is important.

Goblet Squat -> Barbell

The Goblet Squat is a fantastic movement to start to load the abdominal brace. It helps practice the timing of creating tension and a brace prior to movement, with a slight exhalation at the top. Maintaining the pressurized abdominal canister throughout the lift is important particularly at the bottom of squat when the system is under the most stress.

3. Stance / Set Up to Improve Your Squats

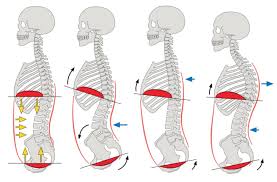
Have you ever noticed how a squat comes so naturally to some people? An important factor to consider for athletes and coaches is the athlete’s anatomy, specifically their femur to torso length. Everyone is built slightly different so the focus should be on working WITH your anatomy, rather than against it. 

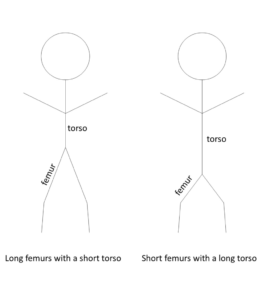
Look at the picture on the right? The stick figure on the right will likely be a “better” squatter due to their segmental proportions. In this case, lets consider better to be a prettier looking squat with a more upright spine. 

The individual on the left can “shorten” their femur by electing for a wider stance. This will allow them to squat deeper while maintaining a more upright spinal position.  This often will allow for a better training effect in the hip and leg musculature with less fatigue in the lower back.

Ways to limit forward lean in the squat:

1.  Short femurs, long torso (Anatomical)

2.  Wider stance for long femurs

3.  Ankle dorsiflexion mobility

4.  Heel elevation with footwear

5.  Bar placement (Front Squat, HBBS)

There is so much more on anatomy of the pelvis, femurs, and hip joint that is beyond the scope of this article. It all boils down to working with your anatomy rather than against it. This allows for the greatest training effect while limiting injury risk .

4. Hip Mobility to Improve Your Squat

In a squat, we need adequate amount of hip flexion to be able to achieve the desired range of motion. Ankle mobility was previously discussed and is obviously a pre-requisite. Rarely is knee flexion a limiting factor in squat depth outside of post-surgical cases.

The hips and more specifically the femoroacetabular joint (femur to pelvis) is a ball and socket joint. Not only does the hip need to be able to adequately flex but this requires a certain amount of relative hip rotation.

“Hip external and internal rotation ultimately determines how much stress goes into the lower back” – Stu McGill

Assessing the hips helps dictate the appropriate set up for the individual athlete and can find the optimal position to increase squat depth while still maintaining a safe lumbar spine position. Dr. Stu McGill goes as far to say that the deep squat is largely governed by genetics and sticking with the theme of this article, it’s important to work with your anatomy rather than against it.  

Check out some of my favorite hip mobility drills:

5. Bar Position for Better Squats

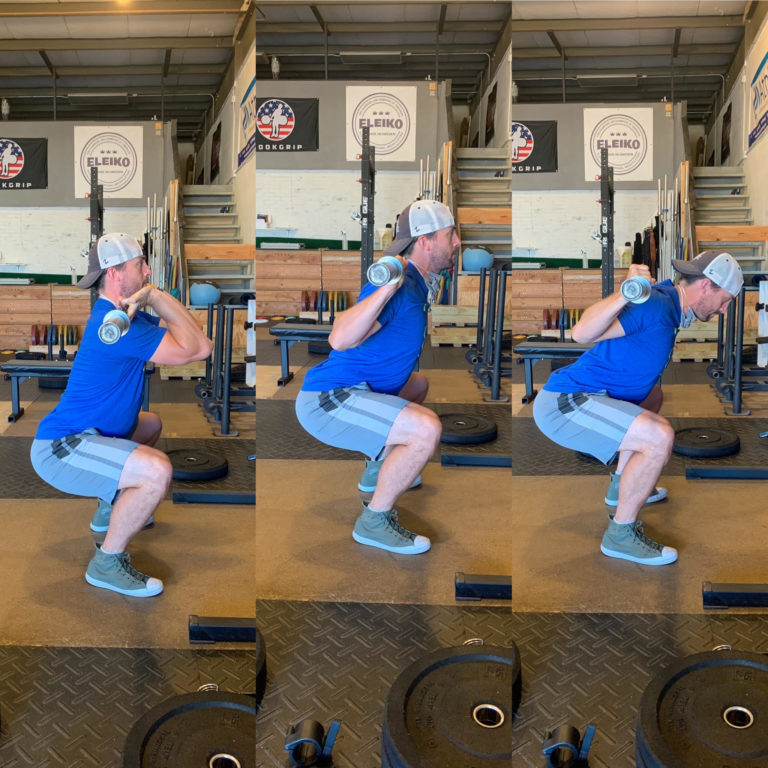
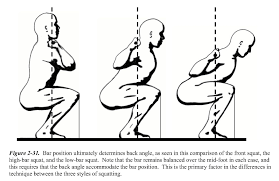
The last of the 5 Ways To Improve your Squat is bar position. Different bar placements allow for different training effects. The difference lies in the shifting of the barbell and what it does to an individual’s spine angle and the activity in key muscles. This allows for differences in programming and to change loads of specific tissues. This is helpful for a training effect and rehabilitation of injuries.  

Front Squat (FS):

The front squat is most unique due to the upright spine angle that typically occurs. It is a phenomenal exercise for those looking to stay pain and injury free while gaining the benefits of squatting. I would also argue that it is vastly under utilized in strength and conditioning. Do More Front Squats.

High Bar Back Squat (HBBS):

This is the position most people think about when they learn to squat. It tends to load the quadriceps a bit more and allow for a greater upright spine angle compared to the LBBS. HBBS is characterized by greater knee flexion, lesser hip flexion, a more upright torso, and a deeper squat compared to the LBBS.

Low Back Back Squat (LBBS):

A low bar back squat tends to load the posterior chain more. It generally results in a less upright spine and emphasizes on the erector spinae, adductors and gluteal muscles. The increase forward lean characteristic of the low bar back squat is something to note as this places a greater demand on the lumbar erectors. Someone with lower back pain that is hoping to keep training may benefit from a more upright spine angle characteristic of the HBBS or the FS. Individuals are strongest with the LBBS because it allows for the greatest activation of the large muscles of the posterior chain which is why many power lifters opt for this bar placement.

Conclusion

A proper assessment can go a long way to maximizing performance and preventing injuries by finding areas of key dysfunction.  I hope you enjoyed the 5 Ways To Improve Your Squat. Many of these issues can be corrected with home exercises, technique modifications, and simple cues allowing you to squat confidently. Working with your anatomy, rather than against it will make squats safer and more enjoyable.

I would be happy to help you find the solution to your squatting problem. In my opinion, everyone should be squatting on a weekly basis. As a foundational movement, we should fight to maintain that ability. 

5 Ways to Improve Your Squat

OMAHA
SPORTS CHIROPRACTOR
Solutions for pain and performance

Leave a Reply